INTRODUCTORY: FPG-9 BUILD AND FLY

Back
In this session, participants will build and test their own gliders.

Category

  • Exploring, Engineering & Technology
  • Exploring, Aviation
  • US DOE, Transportation
  • US DOE, STEM

Objectives

By the end of this session, participants will be able to:


  • Build a model FPG-9 plane. (FPG stands for “Foam Plate Glider” and the 9 is from the 9-inch plate used to make it.)
  • Test the precision of flight and landing of their model planes.

Supplies

  • 9-inch plastic foam plate (one per participant)
  • Penny (one per participant)
  • Ink pen (one per participant)
  • FPG-9 Pattern activity sheet (one per participant)
  • Three to five pairs of scissors
  • Scotch tape
  • Bag for trash
  • Computer with internet access

Advisor Note

Text in italics should be read aloud to participants. As you engage your post in activities each week, please include comments, discussions, and feedback to the group relating to Character, Leadership, and Ethics. These are important attributes that make a difference in the success of youth in the workplace and in life.

It is strongly recommended that the Advisor practice constructing this glider before attempting to lead participants in building it. This activity should be conducted in a safe place with lots of room for testing the gliders but no risk of moving aircraft nearby.

Activity 1

FPG-9 Construction

Pass out the FPG-9 Pattern activity sheet to participants, as well as the plates, pennies, and ink pens.

flyer

Provide these instructions to participants:

Note: These instructions describe construction from a regular foam plate found at any grocery store.

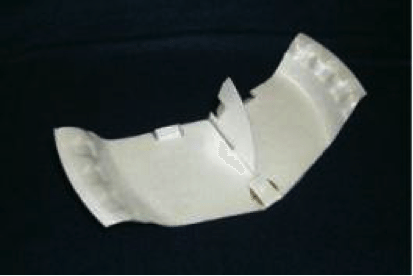
1.) Cut out the FPG-9 pattern from the activity sheet. Do not cut along the dotted line on the paper pattern. Cut only along the bolded lines.

2.) Place the paper pattern in the center of the foam plate, ensuring that the tail of the pattern stays inside of the curved portion of the plate bottom. (The tail must remain on the plate’s flat bottom.) It’s fine if the tab on the front of the pattern is on the curved portion. The ends of the wings should spill over the curved edge of the plate.

flyer2

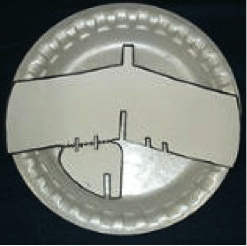
3.) Trace around the pattern with an ink pen. Don’t forget to mark the scissor slits A and B. When tracing slits A and B, make only one line. These lines will create the elevons and rudder.

4.) Cut out the foam template by following the pen lines.

flyer3

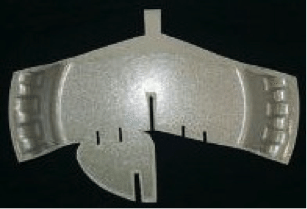
5.) Now cut along the dotted line to separate the tail from the wing of the FPG-9.

6.) The wing and the tail each have slots drawn on them. When cutting out slots 1 and 2, make them only as wide as the thickness of the foam plate. If the slots are cut too wide, the pieces of the plane will not fit together snugly.

7.) To attach the tail to the wing, slide Slot 1 into Slot 2. Use two small (2-inch) pieces of tape to secure the bottom of the tail to the bottom of the wing. Ensure the tail is perpendicular to the wing before adding the tape.

8.) In order for the plane to fly successfully, a penny must be attached to the top of the wing right behind the square tab. Fold the tab back over the penny and tape it down to secure the coin.

9.) Bend the elevons on the wing upward. This will provide for a flatter glide. To make the plane turn, adjust the rudder on the vertical fin.

10.) Your FPG-9 is complete and ready to fly. Gently toss the plane directly in front of you. Once it flies reasonably straight ahead and glides well, try throwing it hard with the nose of the glider pointed 30 degrees above the horizon. The FPG-9 should perform a big loop and have enough speed for a glide of 20 to 25 feet after the loop.

Explain to participants that the FPG-9 uses elevons to control both pitch and roll. In a conventional airplane, elevators control pitch and ailerons control roll. Have participants use the elevons and rudder to try to make their glider turn to the left and turn to the right. Ask: What happens if you remove the penny? What happens if you remove the tail?

If time permits, organize races, competitions, and target practice. Have the participants try to steer using the elevons.

Activity 2

Online Flight Adventure

If a computer with internet access is available, consider having participants play the foam plate glider game at https://www.childrensmuseum.org/legacy-games/flight-adventures. The website includes explanations about the aerodynamics of flight.

Advisor Note

Some sample questions are below. They are designed to help the participants apply what they have learned to their own interests. You are welcome to use these questions or develop your own questions that relate to your post or specific focus area.

Reflection

  • What is one new thing you learned during today’s discussion?
  • What similarities and differences do you notice about this FPG-9 and a real plane?
  • Why do you thing the penny is so important to the flight of the glider?

Advisor and Officer review

After the meeting, address the following:

  • Identify what was successful about the meeting.
  • Identify what needed improvement.
  • Schedule an officer and Advisor planning meeting to prepare for the next post meeting or activity.


Content for this session provided by Youth Aviation Adventure (www.youthaviationadventure.org).

Links to other websites are provided for your convenience and information only. When you click on a link to another website, you will be leaving this website. The fact that we provide links to other websites does not mean that we endorse, authorize, or sponsor the linked website, or that we are affiliated with that website’s owners or sponsors. Unless otherwise indicated, the linked sites are not under our control and we are not responsible for and assume no liability for the content or presentation of any linked site or any link contained in a linked site, or any changes or updates to such sites. Your use of a linked site and its content is at your sole risk and may be subject to restrictions and/or limitations. Always take care to abide by the linked site’s terms of use, including any permission requirements/guidelines.